Home
Overwatch 2 (OW2) Out of Video Memory
- Details
I had an issue where the game would crash and tell me I didn't have enough memory or connection to video card was lost.
My PC specs:
- 16 GB RAM
- 12GB VRAM on a NVIDIA 3060
- Windows 11 (upgrade from 10)
I started running performance monitor and noticed my VRAM usage would never go above 2.5GB.
My Ram would be closer to 11GB used
So what's the issue...
I ran some memory test looking for corrupt memory on both VRAM and RAM and everything seemed good. I replaced my 3060 with a 4070 and still had the same issue.
Well I finally figured out what the issue was:
I don't generally allow windows to use a paging file. I've always been a believer that I have enough ram. I reenabled the paging file in windows 11 and it fixed my issue.
I only discovered this due to the fact that around the time of the crash something in event view was throwing the error can't create pagefile.
Home Assistant (HA) - Proxy request for SmartThings and remote access using AWS free tier.
- Details
I wanted to be able to access my Home Assistant (HA) remotely and while on my local WIFI. If you simply open a port on your router you can do this but will need to change what server your connected to when away or at home. Using a proxy server removes that issue and also has the benefit of allowing other integration such as SmartThings.
This is not a 100% step by step tutorial for setting up an AWS account and creating a free tier server as there are plenty of tutorials like that. This is more aimed at what to do after you created your free tier ubuntu 20 server (or 18.04).
NOTE: Is free tier really free? sort of but being 100% free tier has some drawback. i.e. you'll want a permanent static IP address for your server, which is not part of the free tier. if you choose to not a a static IP every reboot will issue a new IP address.
What to do on your router.
There are so many routers out there so here is the basics.
1. Get you public IP address (from a cellphone or PC using your home network go to https://whatismyipaddress.com/ and get your IPV address. you will need this for later.
2. Login to your home router it should be something like: http://192.168.254.254/ or http://192.168.1.1/ or some other local web URL.
3. Go to port forwarding option in your router. It's probably under the firewall tab or under advanced or advanced->firewall
4. Add an entry for you HA device. I have a Raspiberry . My rule looks like this: port 8123 , protocol TCP , device MyPi (IP 192.168.154.37)
basically you want to open port 8123 from your public IP address to the private IP address of your device. destination port 8123
Some routers list the devices, some routers you just need to enter the private IP address
5. save your changes
What to do in HA:
In you HA config file /config/configuration.yaml
# Loads default set of integrations. Do not remove.
default_config:

# Load frontend themes from the themes folder
frontend:
  themes: !include_dir_merge_named themes

# Text to speech
tts:
  - platform: google_translate

automation: !include automations.yaml
script: !include scripts.yaml
scene: !include scenes.yaml

alexa:
  smart_home:

http:
  server_port: 8123
  cors_allowed_origins:
    - https://google.com
    - https://www.home-assistant.io
  use_x_forwarded_for: true
  trusted_proxies:
    - 192.168.254.254
#  ip_ban_enabled: true
#  login_attempts_threshold: 5
you what the http: block
change the - 192.168.254.254 to your routers IP address
you can set the ip_ban_enable but you might end up banning your proxy so I have it commented out here.
restart HA (full restart not just YAML reload)
What to do in your AWS account:
1. create a t1.micro instance in EC2 using the UBUNTU OS. I used ubuntu 18.04.x (use the default settings for the EC2 instance).
2. Make sure to get your key so you can use SSH to login via putty (or you can just use the aws console options to enter commands.
3. create a public IP address and assign it to the instance of the instance has started up.
What to do in console:
1. Go to SSH console and update everything by running:
sudo apt-get update
sudo apt-get upgrade
sudo reboot
Your new server should be all up to date with packages.
2. Install nginx
sudo apt-get install nginx
unlink /etc/nginx/sites-enabled/default
cd /etc/nginx/site-available
3. Edit the site config
sudo touch /etc/nginx/ssl/fullchain.pem
sudo touch /etc/nginx/ssl/privkey.pem
sudo nano reverse-proxy.conf

#PASTE and MODIFY the following into the config file
#Swap out ha.yourdomain.com with a domain if you have one
#swap out your.home.ip.address with your routers public IP address

server {
    listen              443 ssl;
    server_name         ha.yourdomain.com;
    ssl_certificate     /etc/nginx/ssl/fullchain.pem;
    ssl_certificate_key /etc/nginx/ssl/privkey.pem;
    ssl_protocols       TLSv1 TLSv1.1 TLSv1.2 TLSv1.3;
    ssl_ciphers         HIGH:!aNULL:!MD5;

    location / {
        proxy_pass http://your.home.ip.address;
    proxy_http_version 1.1;
    proxy_set_header Upgrade $http_upgrade;
    proxy_set_header Connection "upgrade";

        }
}
Don't start the service because it will fail due to no real SSL cert.
Also note that after certbot runs your ssl_certificate and ssl_certificate_key will have changed to something like this:
- ssl_certificate /etc/letsencrypt/live/ha.mydomain.com/fullchain.pem; # managed by Certbot
- ssl_certificate_key /etc/letsencrypt/live/ha.mydomain.com/privkey.pem; # managed by Certbot
4. install certbot for nginx
sudo snap install --classic certbot
sudo ln -s /snap/bin/certbot /usr/bin/certbot
sudo certbot --nginx
Pick your site based on the domain name in the config file and follow the prompts. The cert bot will keep your cert renewed which is nice.
5. If all goes you can start nginx.
sudo service nginx start
Test it!
Go to your IP address or domain via https://
you should see the HA web interface is SSL
What is really happening is nginx is creating s SSL connection to your web browser and proxying your non-SSL traffic from your home router
What to do for SmartThings:
This will only work if you can browse via HTTPS.
You'll need your Smart Things login.
- Log into the personal access tokens page and click ‘Generate new token’
- Enter a token name (can be whatever you want), for example, ‘Home Assistant’ and select the following authorized scopes:
- Devices (all)
- Installed Applications (all)
- Apps (all)
- Locations (all)
- Scenes (all)
- Schedules (all)
- Click ‘Generate token’. When the token is displayed copy and save it somewhere safe (such as your keystore) as you will not be able to retrieve it again.
You'll enter your https URL and token into HA

Home Assistant (HA) automation for elderly or disable call button
- Details
I recently had a need for my father-in-law to be able to push a button and get my wife and I's attention. I had all the hardware but just need to do a little work in HA to get it working well. If you want to be able to receive the alerts on your phone while you're off the local WIFI you will need to have your HA setup via a port forward in your router (and optionally a reverse proxy running on AWS so you don't have to switch between your local LAN IP and Router Public IP)
Functionality:
When dad presses the button I want:
- My phone to notify me.
- Wife's phone to notify her.
- A voice prompt to play on the Google nest hub smart speaker/display (to wake us from our sleeping slumber)
Hardware in place:
- Raspberry PI (raspi 3-64 1gig ram) running latest version of Home Assistant.
- GALOOK wireless USB Dongle, Universal Zigbee Gateway
- ThirdReality Zigbee Smart Button
- Google nest hub
- Cellphone that can run Home Assistant mobile app
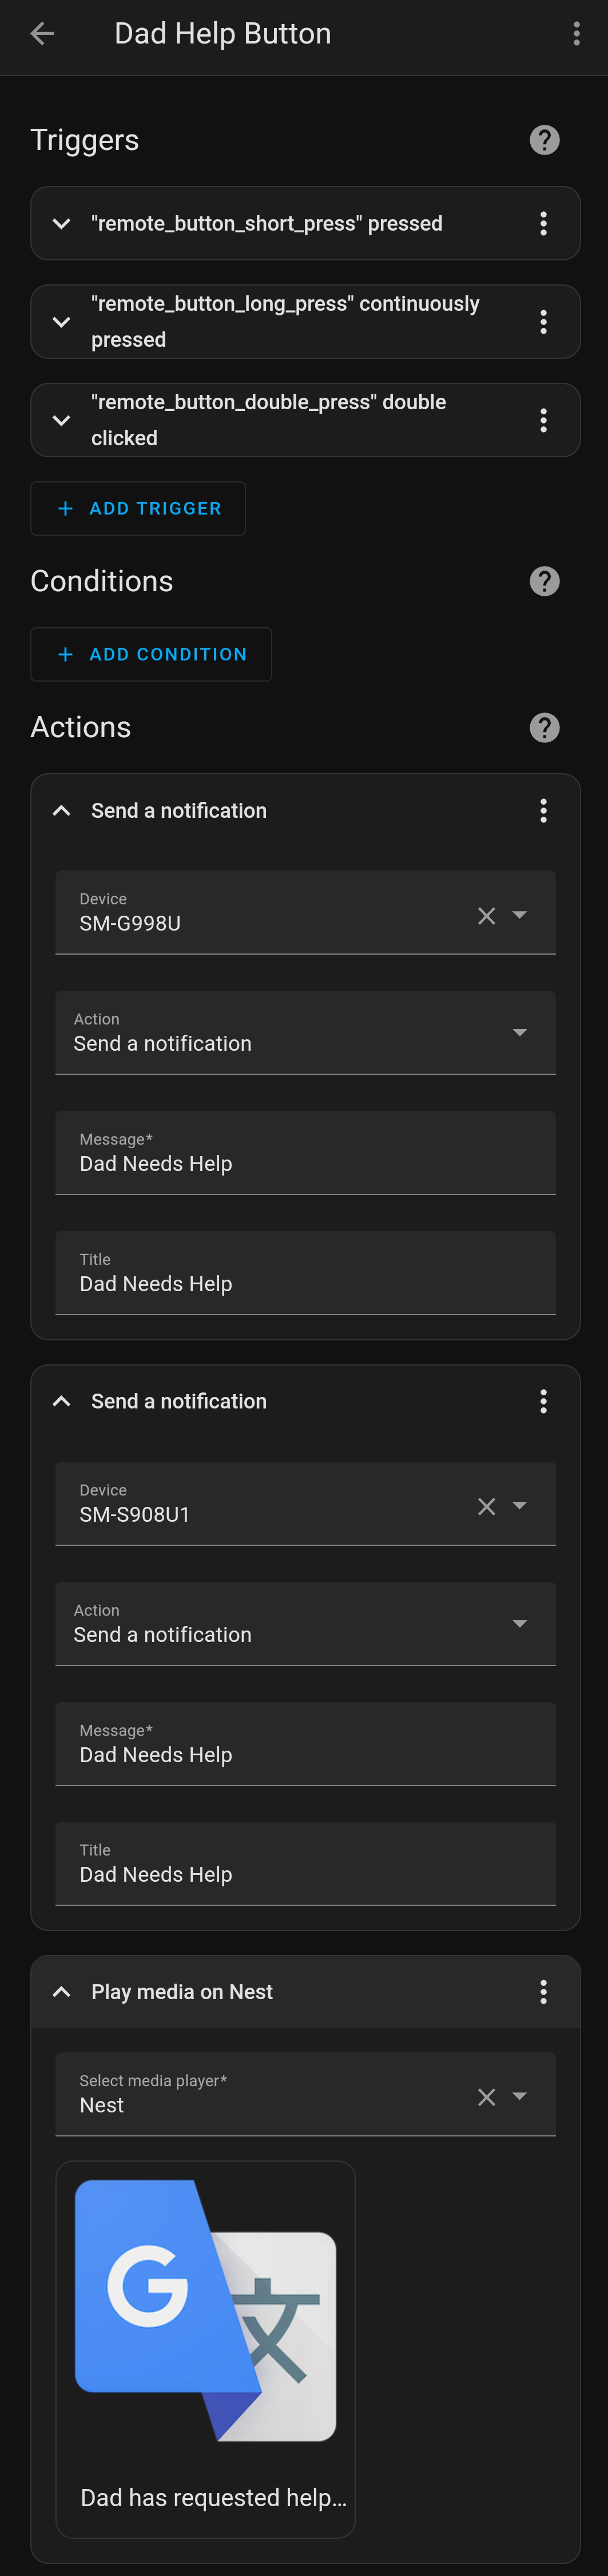
Here is what the automation looks like. The reason for using all the different triggers for the same button is: his motor control in his hands varies a lot (so why not cover all situations). YAML below image:
- id: '1651820145253'
  alias: Dad Help Button
  description: ''
  trigger:
  - device_id: b75882a325a669bcbc005942637bdbd5
    domain: zha
    platform: device
    type: remote_button_short_press
    subtype: remote_button_short_press
  - device_id: b75882a325a669bcbc005942637bdbd5
    domain: zha
    platform: device
    type: remote_button_long_press
    subtype: remote_button_long_press
  - device_id: b75882a325a669bcbc005942637bdbd5
    domain: zha
    platform: device
    type: remote_button_double_press
    subtype: remote_button_double_press
  condition: []
  action:
  - device_id: e9ed4e00be80a486717e3ae827b2c5e2
    domain: mobile_app
    type: notify
    message: Dad Needs Help
    title: Dad Needs Help
  - device_id: 43b454b3aa01b3ba4ed5369704eca082
    domain: mobile_app
    type: notify
    message: Dad Needs Help
    title: Dad Needs Help
  - service: media_player.play_media
    target:
      entity_id: media_player.nest
    data:
      media_content_id: media-source://tts/google_translate?message=Dad+has+requested+help.++Dad+has+requested+Help.&language=en-us
      media_content_type: provider
    metadata:
      title: Dad has requested help.  Dad has requested Help.
      thumbnail: https://brands.home-assistant.io/_/google_translate/logo.png
      media_class: app
      children_media_class:
      navigateIds:
      - {}
      - media_content_type: app
        media_content_id: media-source://tts
      - media_content_type: provider
        media_content_id: media-source://tts/google_translate?message=Dad+has+requested+help.++Dad+has+requested+Help.&language=en-us
  mode: single
ChatGPT
- Details
What is all the hype around ChatGPT? I really don't get it. I've played with it and was thoroughly disappointed. It pretty obvious when you ask it to write something the it's not genuine and green. If you ask it for a few different writings, it becomes obvious that it is templatized in some form. ChatGPT is about the equivalent of taking the first results of a search engine and calling it good. This type of tech is still 10 years away for it to be a game changer. To the teachers that are worrying, calm down! You'll be able to spot something created by AI, just like you you can tell a student by the way they write, AI has a similar feel and signature to it..
Page 1 of 40